

If you ask a room of orthodontists how a retainer should be cleaned, most describe two steps, not one. In a survey reported in a comparative study of retainer cleaning methods, 79.1% of orthodontists recommended combining chemical and mechanical cleaning, and 87.4% recommended daily cleaning. That's the whole argument in a sentence. The brush does the core work, the soak supports it, and neither one carries the routine by itself.
Most of what circulates online picks a side instead. Some people swear by effervescent tablets and never touch the plastic with a brush. Others scrub with toothpaste twice a day and can't work out why the appliance turns cloudy after a year. Knowing how to clean retainers without wrecking them comes down to getting the order right and knowing which habits cause permanent damage. What follows is the routine we recommend to patients after orthodontic treatment, plus the places where the evidence is thinner than the marketing suggests and the warning signs that mean it's time to stop cleaning and call the office.
This is general information, not a treatment plan for any one person. Your own appliance and your own case decide the details.
Table of Contents
- Cleaning Routine by Retainer Type at a Glance
- How to Clean a Removable Retainer Step by Step
- Cleaning Methods to Avoid and Why They Damage Retainers
- Which Cleaning Products Actually Remove Buildup
- Fixed Retainers and Cloudy, Stained or Damaged Retainers
- Confirm Your Cleaning Routine With Dr. Finley
Cleaning Routine by Retainer Type at a Glance
A clear removable retainer and a fixed bonded wire need different work on the same day. Plastic scratches under harsh abrasives and clouds when saliva film dries onto it, while a wire fixed behind the teeth collects plaque where a standard brush cannot reach. The schedule below is the default split by appliance.
| Retainer type | Task | How often | What to use |
|---|---|---|---|
| Removable clear retainer | Rinse after removal | Every time it comes out | Cool or lukewarm water |
| Removable clear retainer | Brush all surfaces | Once daily | Dedicated soft-bristled brush and mild liquid or dish soap |
| Removable clear retainer | Soak | About once a week | Retainer-compatible effervescent cleanser, per the product label |
| Fixed retainer | Brush teeth and wire | Once daily | Soft-bristled toothbrush |
| Fixed retainer | Floss under the wire | Once daily | Floss with a threader or an interdental brush |
| Any retainer | Brush teeth and floss before reinsertion | Before each reinsertion | Toothbrush and floss |
The daily rows exist because of how fast a retainer's biofilm organizes. A 2022 in-vivo study followed the microbial communities forming on clear orthodontic retainers across 14 days and tracked how the bacterial population on the appliance and in saliva kept shifting (the 14-day study of microbes on clear retainers). Microbial diversity dropped between days 7 and 14, and by the end of that second week both saliva and retainer surfaces carried numerous bacteria associated with dental caries, gingivitis, periodontitis, and enamel demineralization. The study maps colonization and stops short of claiming a retainer causes any of those conditions. What it documents is speed: a worn appliance becomes a settled microbial habitat in about two weeks.
On a removable retainer, the weekly soak backs up the daily brush. On a fixed retainer, the threader does the equivalent work under the wire.
Treat the schedule as a default your own instructions can override. Once orthodontic treatment ends, your orthodontist provides specific guidelines for keeping the teeth in their new positions, and the right cleanser and timing depend on the material your appliance is made from. Where that guidance differs from the table, the guidance wins.
How to Clean a Removable Retainer Step by Step
A removable retainer stays clean through one thorough brushing a day, quick rinses in between, and a weekly soak that backs the brushing up. The brush does the core work; the soak handles only what bristles leave behind. The sequence below follows the American Association of Orthodontists guide to cleaning a retainer, and the reason behind each step matters as much as the step itself.
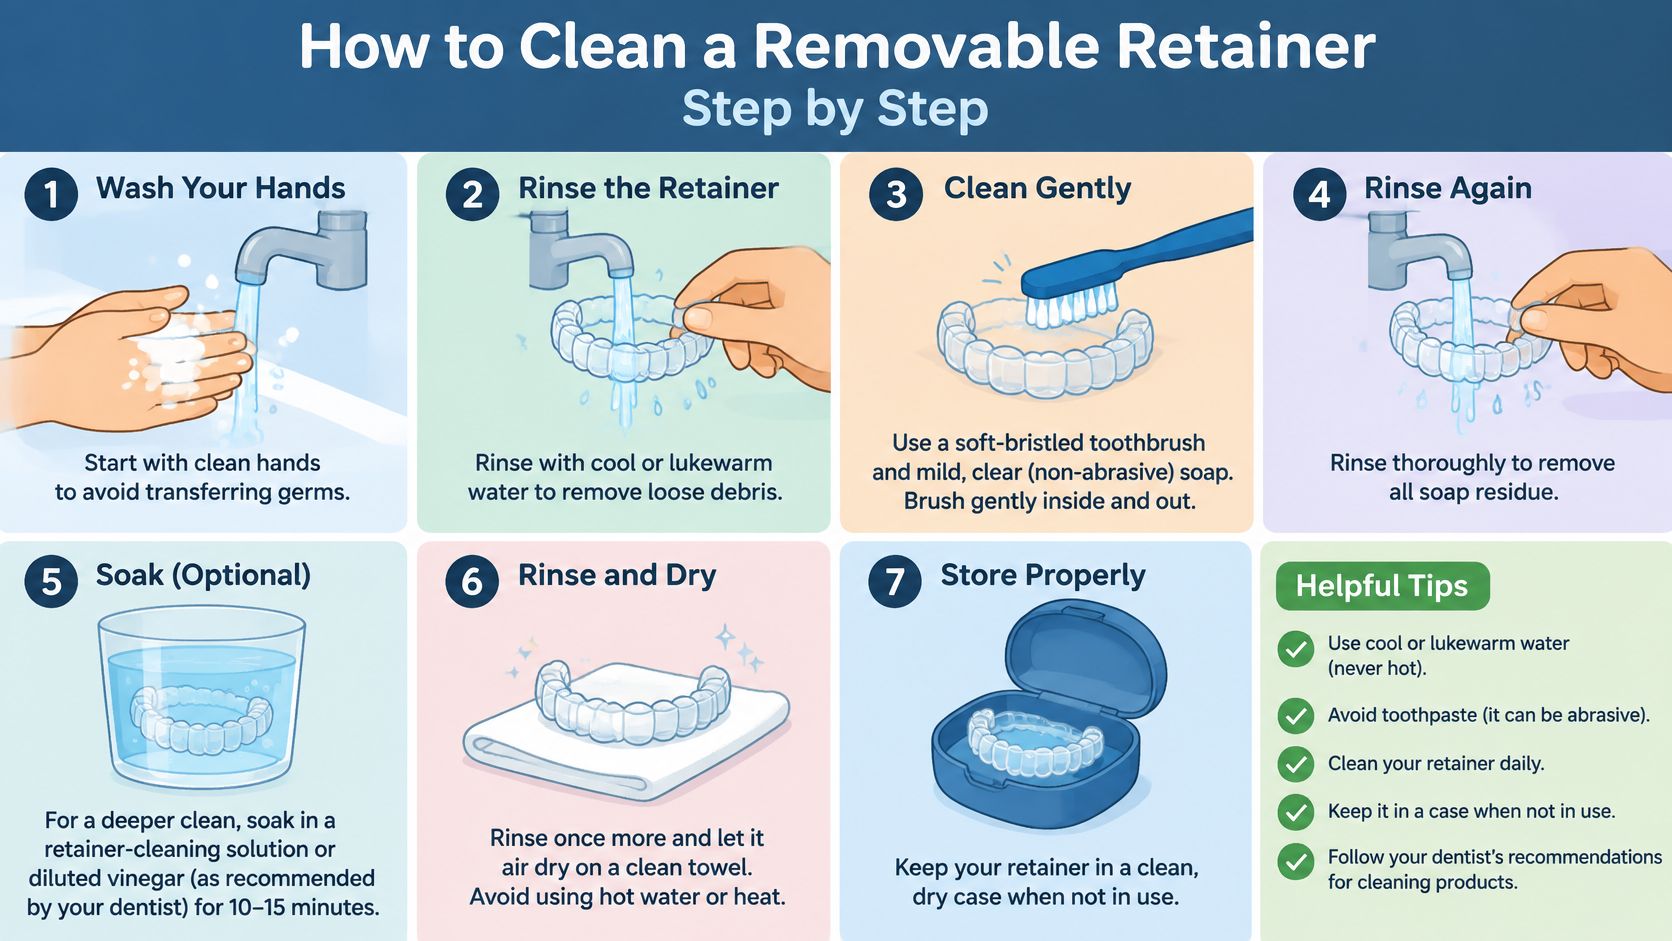
The daily pass
- Rinse it while the saliva is still wet. Run cool or lukewarm water over it right away. Dried saliva bonds harder than fresh, and the usual slip is leaving the retainer on a nightstand until bedtime.
- Brush every surface, inside and out. Use a soft-bristled brush kept only for the retainer, with a small amount of mild liquid soap or dish soap. Work the bristles into the deepest part of each tooth pocket and along the edge that sits at the gumline, where film collects first. Toothpaste is built for enamel, so keep it for your teeth.
- Rinse until no soap taste remains. A lingering flavor usually means a lingering film rather than a clean surface.
- Run a fingertip along the edges and clasps. Film gathers where plastic meets wire. If your finger comes away slick, go back over that spot.
- Air-dry in the case with the lid open. Leave it open until the plastic feels completely dry to the touch. Sealing a wet retainer into a closed box keeps everything damp and encourages odor.
The weekly soak
Once a week, drop the retainer into a retainer-compatible effervescent cleanser and follow the label exactly, including the water temperature and how long to leave it. The soak's job is narrower than the brush's: a tablet loosens deposits, so it supports the daily pass instead of standing in for it. Longer is not better, overnight soaking is not automatically safe unless the product says so, and not every tablet suits every material, so match the cleanser to what your retainer is made of.
Three checks tell you whether the routine is working:
- Hold the retainer up to a light or against something white. A hazy look or a white crust along the edges is buildup the brush is missing.
- Smell the case when you open it. A clean retainer has no odor, so anything sour or stale points to bacteria sitting on a damp surface.
- Seat it with finger pressure alone. It should settle onto your teeth without force; needing to bite it into place is a fit issue that cleaning will not fix.
If any of these fails, the answer is usually a more consistent routine rather than a stronger product.
One habit sits outside the cleaning routine and matters just as much. Clear plastic retainers come out before you eat or drink anything, and plain water is generally the only thing that is fine while wearing one (the AAO's guidance on taking care of retainers). Seating a retainer over food debris presses sugar against enamel for hours.
Cleaning Methods to Avoid and Why They Damage Retainers
Hot water ends more retainers than any other single mistake. Patient instructions from Plymouth Hospitals NHS are direct about it: clean retainers with cold water, and keep them away from hot water and hot places, because heat can melt or distort the plastic (Plymouth Hospitals NHS retainer instructions). A dishwasher cycle, a radiator, a stove top, a car dashboard in August, and a pan of boiling water all deliver the same outcome. The plastic softens, relaxes out of the shape it was formed into, and sets again slightly wrong.
Toothpaste is the second habitual mistake, and it's the one people defend hardest. Nottingham University Hospitals advises liquid soap and water with a spare toothbrush and specifically says to avoid toothpaste because it can discolor the retainer (Nottingham University Hospitals orthodontic retainer guidance). Abrasive particles that are designed to polish enamel carve fine scratches into softer plastic. Those scratches scatter light, so the tray turns permanently hazy, and they give bacteria somewhere to settle that bristles can't reach. The cycle is unkind: the retainer smells, the owner scrubs harder with toothpaste, and the surface gets rougher each time.
The rest of the list is short and worth memorizing.
- Bleach, even diluted: it degrades and discolors plastic, attacks metal components, and leaves residue you don't want in your mouth.
- Alcohol-based mouthwash soaks: alcohol can dry and stiffen some plastics, and colored rinses can tint a clear tray.
- Strong detergents and homemade solutions: anything not intended for an oral appliance can damage the material or leave a taste that rinsing won't shift.
- Hard-bristled brushes and scouring pads: the mechanical version of the toothpaste problem, and just as permanent.
A rule that prevents most of this: if the water is too hot to hold your hand under comfortably, it's too hot for the retainer.
Stronger doesn't mean safer. Cleaning choices trade off stain removal, microbial reduction, and surface condition, and a harsh product can leave you with a clean-looking appliance that no longer fits or no longer looks clear. Check the label or ask our office before trying anything new. If a retainer has already been through heat and no longer seats properly, don't force it back in. Call the dental office, because pressing a distorted appliance onto your teeth can push them in directions nobody planned.
Which Cleaning Products Actually Remove Buildup
The question patients ask most is whether a cleaning tablet can replace the brush. It can't, and two studies make that case from different angles.
The first is a double-blind, randomized clinical trial published in 2017, with 60 volunteers wearing clear Essix retainers full-time for 14 days. Every participant brushed with water, then soaked daily for 15 minutes in one of three alkaline-peroxide tablets, with brushing alone as the control. None of the three products produced a statistically significant extra drop in bacteria, with reported P-values of 0.60, 0.37, and 0.50 (the 2017 randomized trial on retainer cleaning methods). A tablet layered on top of brushing did no measurable extra work against bacterial counts.
The second study asks what chemistry can do against biofilm that has already set. In an ex vivo experiment, commercial orthodontic cleaners outperformed tap water on seven-day-old biofilm, yet even the strongest product removed only 54.5% of it, leaving substantial biofilm behind (the ex vivo study on biofilm removal from retainers). Partial removal at best is why the researchers concluded chemical cleaners shouldn't be the only method.
| Cleaning approach | What the studies found | How to use it |
|---|---|---|
| Brushing with mild soap | Mechanical cleaning was the control arm in the 2017 trial and did the core work | Daily baseline |
| Strongest tested commercial cleaner | Removed more seven-day-old biofilm than water alone, yet left substantial biofilm behind | Use alongside brushing, per label |
| Alkaline-peroxide tablet after brushing | No statistically significant extra bacterial reduction versus brushing alone | Optional; follow the label |
The table records measurements, which don't guarantee results on your appliance. The 2017 trial tracked clear Essix-style retainers over 14 days and counted bacteria rather than odor, staining, or long-term wear, so it can't say what a tablet does for a Hawley retainer's acrylic and wire, or for a stubborn smell.
The useful conclusion is structural and holds across brands. Brushing disrupts the deposits; a soak reaches crevices and residue the bristles miss. Each step covers ground the other can't.
Material is the caution generic guides tend to skip. A soak labeled for clear plastic may not suit acrylic or metal components, so match the product to the appliance's materials and respect the contact time on the label. Longer is not better; extended soaking in the wrong solution can cloud plastic or corrode solder joints.
So build the routine in two parts. Brush gently every day, and I recommend adding a compatible soak about weekly if the label allows. A tablet supports a consistent routine but can't rescue a week of skipped cleaning. If film persists after two steady weeks, bring the retainer to an appointment rather than reaching for a harsher product at home.
Fixed Retainers and Cloudy, Stained or Damaged Retainers
A bonded wire creates a different cleaning problem from a removable tray. Cleaning a fixed wire means working on the tooth surface and gumline around it, and the wire changes the angles your brush and floss can reach.
Cleaning around a fixed wire
Brush the teeth and the wire daily, then use floss with a threader or an interdental brush to pass beneath the wire and clean each contact area at least once a day (the American Association of Orthodontists' retainer FAQ). The wire itself collects little. The trouble sits underneath it, where food packs in and a toothbrush arrives at the wrong angle.
Retainers exist to hold a finished result in place. Patients receive retainers to maintain their smile once Invisalign treatment is complete, and a bonded wire does the same job in a form you can't take out and rinse. Because it stays in place around the clock, whatever slips past your brush stays there until your next cleaning.
Here's the split between the two appliance types, and what each one needs.
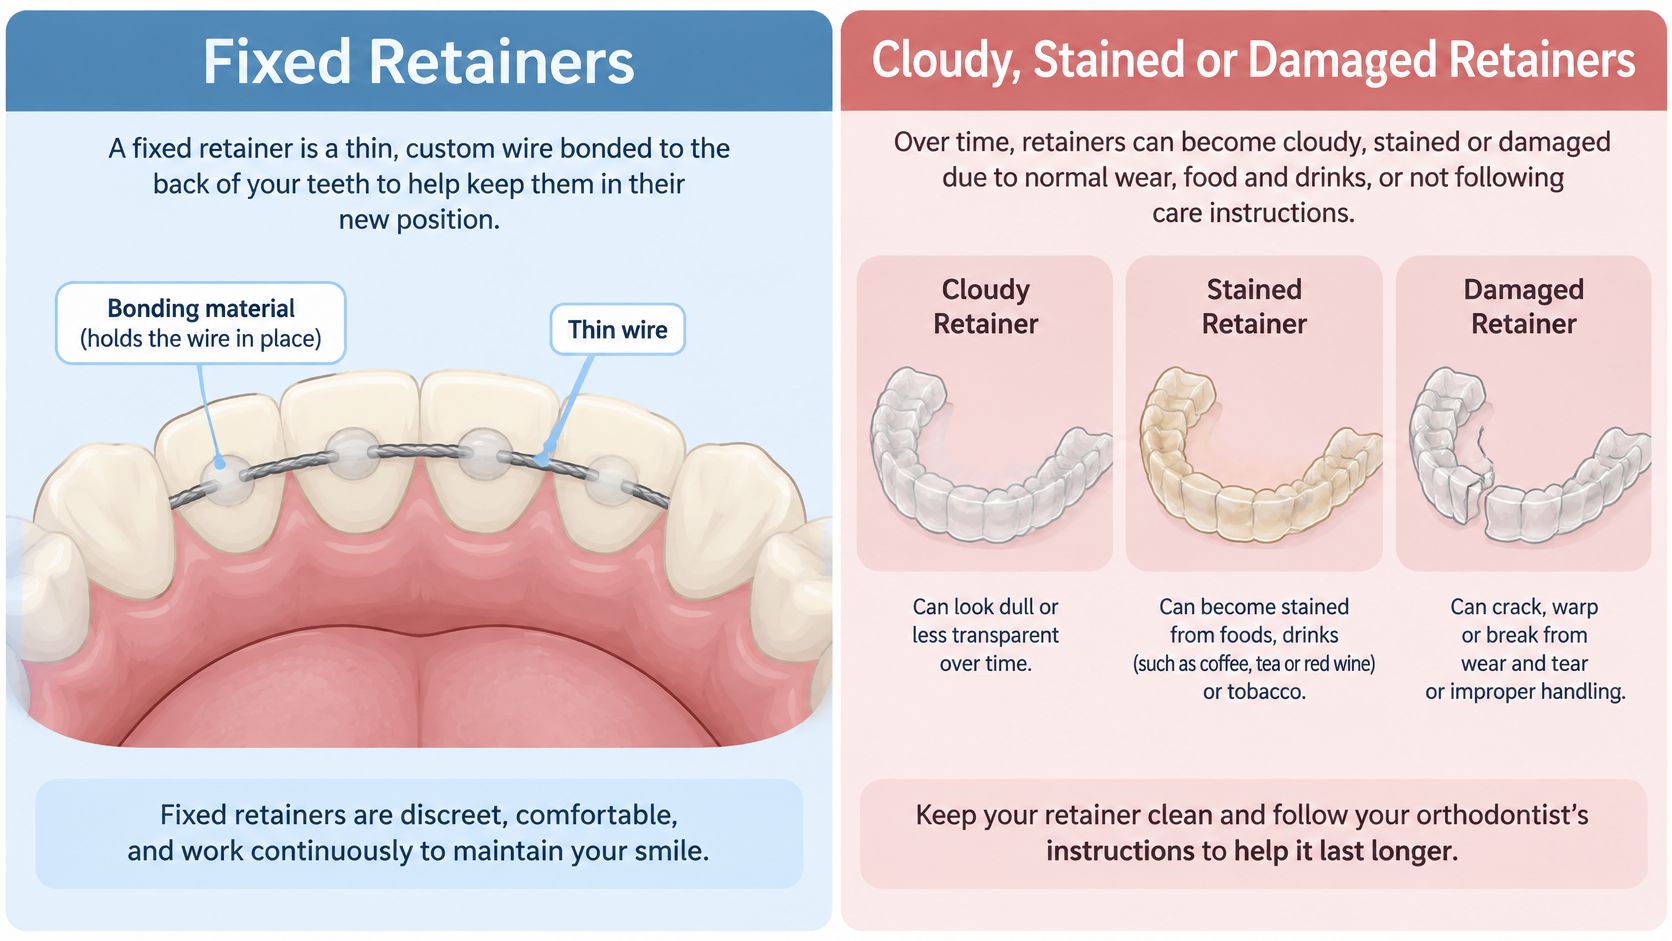
When the plastic looks different
Hazy or cloudy plastic usually means one of two things. Mineral film from saliva sits on the surface like scale in a kettle, or years of abrasive brushing have scratched the plastic itself. A labeled soak may lift the first. Nothing at home reverses the second, and no amount of scrubbing will.
Visible yellow or brown staining often responds to a compatible effervescent soak used exactly as directed; harder scrubbing tends to scratch before it lifts. Hard, crusty deposits along the gumline edge are a different category. Those need a professional assessment, because they've had time to mineralize and the plastic underneath may already be marked.
Some changes mean the cleaning phase is over.
- Cracks or splits, however fine: they concentrate stress, harbor bacteria, and widen over time.
- Warping or a visible change in shape: the appliance no longer matches your teeth, so wearing it can nudge them somewhere unplanned.
- A retainer that suddenly feels tight or loose: the fit has shifted, and cleaning will not restore it.
- A wire that feels loose or sharp: it can move teeth unpredictably and irritate the tongue.
A retainer that has changed shape isn't a dirty retainer. No cleaning method brings it back, and forcing it into place can make the problem worse.
Ultrasonic cleaners have become popular, and they can loosen debris, but the evidence for home use is thin and devices vary widely. I'd treat one as a supplement to brushing at most. A device that hums for ten minutes cannot undo a crack, a warp, or weeks of skipped cleaning.
Confirm Your Cleaning Routine With Dr. Finley
The routine here covers most situations, but the last word belongs to the clinician who knows your appliance and your case. After orthodontic treatment is completed, the orthodontist provides specific guidelines to keep the teeth in their new positions, and those guidelines outrank any general advice, including this article. A soak that's fine for one material can dull or weaken another.
Dr. Finley personally oversees every Invisalign case at the Santa Ana office, from consultation through completion, and patients see the same dentist at every visit. That continuity matters when the conversation turns to retainers, because the person reviewing your appliance already knows how your teeth moved and what the plastic is expected to do.
None of this replaces an exam of the actual retainer. A hazy tray, a persistent smell that survives two weeks of consistent cleaning, or a fit that has shifted are all things to raise at your next visit rather than solve with a stronger product. Bring the retainer with you and let us look at the surface and the fit together.
Bristol Dental and Orthodontics in Santa Ana provides orthodontic care for the whole family, from Invisalign treatment through the retainer that protects your results, along with the cleanings and exams that catch problems a retainer can hide. If your appliance is cloudy, loose, cracked, or you're just not certain your cleaning routine is doing its job, bring it with you and we'll take a look. Visit Bristol Dental and Orthodontics to see our services or to schedule a visit at our office on South Bristol Street.