
A dental implant abutment is the connector between the implant placed in your jawbone and the crown, bridge, or denture you see above your gum.
If you're reviewing an implant treatment plan, you may have expected to discuss a replacement tooth, not a collection of small components. Understanding this hidden middle piece can help you ask more useful questions about appearance, stability, cleaning, and future repairs.
Table of Contents
- What a Dental Implant Abutment Is
- Where the Abutment Sits Among the Implant Parts
- How the Abutment Is Attached in Two Stages
- How Connection Design Keeps the Crown Stable
- Why Abutment Design Affects Cleaning and Gum Health
- Abutment Materials and What Each Trades Off
- Confirm Your Abutment Plan at Your Consultation
What a Dental Implant Abutment Is
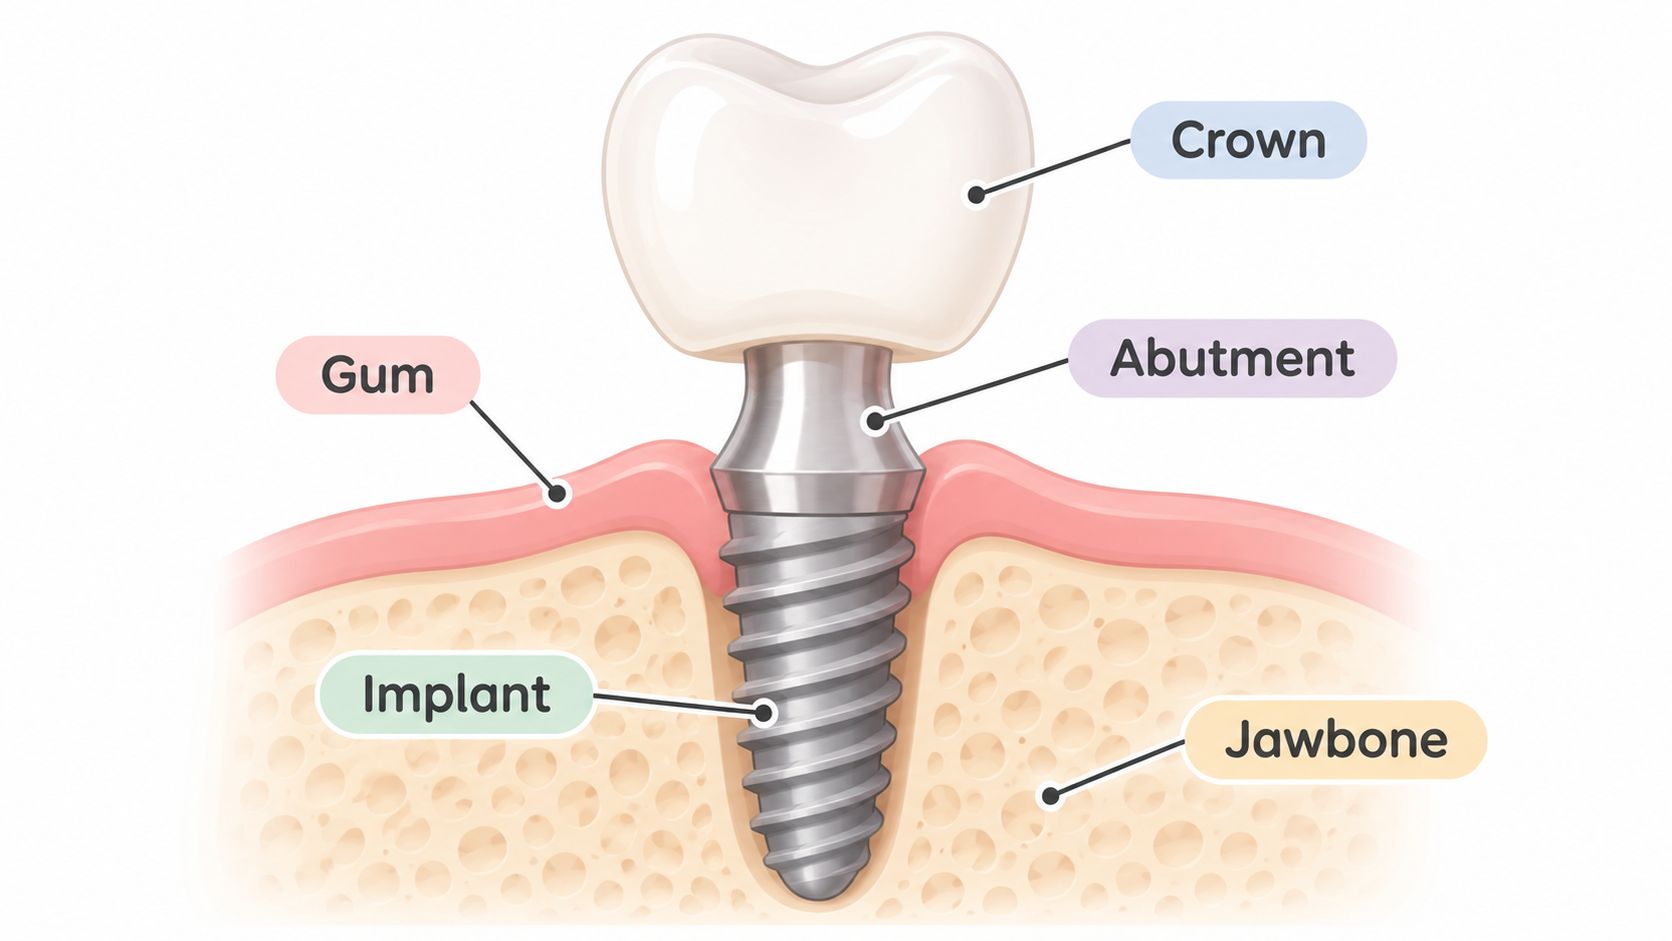
A patient studying the cross-section diagram below may pause at the narrow piece between the metal root in the bone and the tooth above the gum. That piece is the abutment, the connector that carries the replacement tooth from the implant through the gum.
The U.S. Food and Drug Administration's implant guidance describes the abutment as a prosthetic component directly connected to an endosseous implant, meaning an implant within bone, and identifies three potential system parts: the implant body, the abutment, and the abutment fixation screw. After healing, the abutment may be permanently attached and extend above the gum to support the artificial tooth.
Why the middle piece matters
Everyday speech uses implant for the whole replacement tooth. In clinical use, the implant body is the part in the jawbone, while the crown, bridge, or denture is the visible tooth. The abutment joins them, so its design shapes how the restoration sits, looks, and is cleaned.
An abutment can be prefabricated, selected from components designed for an implant system, or custom designed for the patient's anatomy and restoration. The abutment sets the height and angle of your tooth, so treat it as a design decision. Its shape also controls where the restoration meets the gum, which is both a mechanical joint and a biologic boundary.
A front-tooth restoration may need a carefully shaped transition at the gumline so the crown does not look abruptly wider than its base. A back-tooth restoration has different demands because chewing forces and available space may matter more.
Practical rule: Ask how your abutment will be shaped before the crown is made. That choice affects fit, appearance, and how easily you can clean around the tooth.
Much of the abutment usually stays beneath the finished restoration, so you may never notice it directly. Still, knowing what it does makes an implant diagram, estimate, or treatment discussion easier to follow.
Where the Abutment Sits Among the Implant Parts
The parts form a vertical stack, and the joint between the implant body and the abutment is where the design becomes specific. Follow the load from the bite downward: the restoration receives it, the abutment transfers it, the screw holds the joint closed, and the implant body carries it into bone.
| Part | Where It Sits | Main Job |
|---|---|---|
| Implant body | Inside the jawbone | Acts as the foundation and replacement tooth root |
| Abutment | Between the implant and the restoration, passing through the gum | Sets shape, height and angle for the restoration |
| Abutment screw | Inside the implant-abutment joint | Creates preload that holds the parts together |
| Crown, bridge or denture | Above the gum | Provides the visible replacement tooth |
A diagram can make the screw and abutment look like one unit. They do separate jobs. The abutment supports and positions the restoration. The screw creates preload, the clamping force that holds the joint closed. A biomechanical overview of implant-abutment connections explains that this joint depends on compatible geometry, closely fitting surfaces, screw characteristics, and the forces produced during chewing.
Compatibility is the part patients rarely see. An abutment made for one implant system may have a different connection shape, thread pitch, or seating surface than another system. If those surfaces do not match, the abutment can sit high, rock slightly, or fail to hold preload. The restoration may feel acceptable at first and loosen later. That is why the dental team matches the abutment to the implant platform rather than choosing a connector by appearance alone.
The table shows a typical arrangement. Attachment designs vary by restoration type. A single crown needs a connector that fits beside neighboring teeth and supports a natural gumline. A bridge or denture adds a second question: how the supporting implants share the load and whether the patient can clean beneath the restoration.
When you know the stack, you can ask which connection your implant uses and why the chosen abutment suits the tooth it will support.
How the Abutment Is Attached in Two Stages
In a conventional two-stage implant treatment, placement and healing come before the later connection procedure. That sequence allows the dental team to assess healing before proceeding with the final replacement tooth.
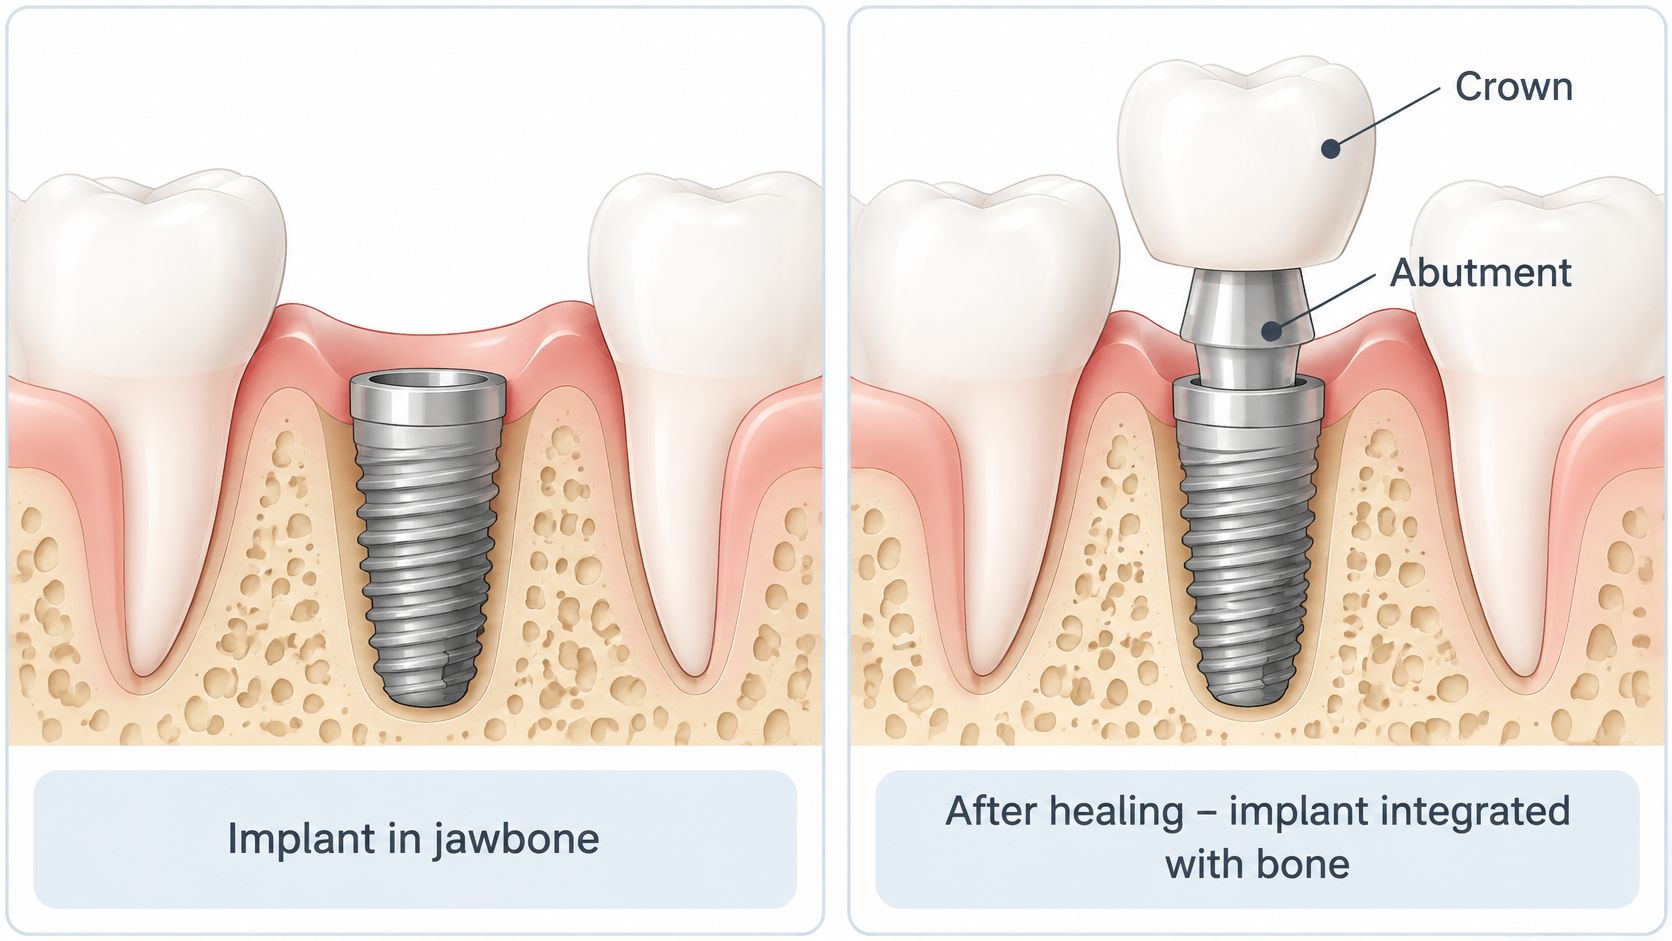
Place the implant in the jawbone. Implant placement is a surgical procedure. The implant occupies the foundation position, where it will act as a replacement tooth root rather than the visible chewing surface.
Allow the implant to integrate with bone. At Bristol Dental & Orthodontics, this healing period typically takes 3 to 6 months. Dr. Finley determines the appropriate timing for your case rather than relying on a calendar alone.
Attach the abutment after healing is confirmed. In many two-stage plans, this involves another, generally shorter procedure to access the implant and connect the abutment. Some one-stage approaches place a component through the gum during the original surgery, so not everyone follows an identical sequence.
Record the position and surrounding anatomy. Impressions or digital measurements provide the information needed to make the restoration. These records help the laboratory match the planned connector, neighboring teeth, and available bite space.
Fit and evaluate the restoration. After the jawbone has healed and the implant has bonded to bone, the patient receives a custom-made crown, bridge, or denture. The fitting includes checks of seating, bite, gum contour, and appearance.
What custom fitting means
Whether the abutment is prefabricated or custom designed, the finished restoration must fit its supporting components and work with the rest of your mouth. Dr. Finley also checks that the final restoration matches your natural teeth in color and shape.
Your treatment sequence should reflect healing and clinical findings, not pressure to reach the final crown by a particular date.
Our team checks progress at each stage. At your consultation, Dr. Finley can explain which approach is planned and what must happen before the next step.
How Connection Design Keeps the Crown Stable
Tightening the abutment screw stretches it slightly and creates preload, the clamping force that holds the abutment against the implant while chewing forces pass through the restoration. A secure joint depends on that clamp remaining high enough after the restoration is loaded.
A review of abutment screw mechanics explains that approximately 10% of applied torque produces useful preload, while most of the remainder is consumed by friction, and reports commonly recommended tightening values of approximately 10 to 35 Ncm. The correct setting is specific to the screw material, connection geometry, and implant system. A patient should not try to apply these values at home.
A calibrated torque driver helps the clinician apply the manufacturer's specified tightening force. Hand tightening alone may not produce the intended clamping force. If chewing forces exceed the retained preload, tiny movements can contribute to loosening, wear, or fracture.
What connection geometry changes
Internal conical and Morse-taper connections use tapered mating surfaces to add frictional engagement and help resist movement under sideways loading. External flat-to-flat connections engage differently, which can affect how the joint responds to repeated forces.
A 2025 systematic review of 21 laboratory studies reported the pooled torque-loss values below, using cyclic-loading protocols commonly ranging from 50,000 to 3,000,000 cycles at 100 to 300 N.
Pooled torque loss by connection type
| Connection type | Pooled torque loss |
|---|---|
| External hex | 23.9% |
| Internal hexagon | 19.2% |
| Morse-taper | 16.6% |
| Conical | 16.0% |
These are laboratory measurements, not patient failure rates. The studies used different materials and testing conditions, and the review reported substantial variation between studies. The table doesn't establish that every patient should receive the same connection.
Abutment angulation also matters because an off-axis load can create more bending at the joint. A suitable plan therefore considers implant position, bite direction, restoration design, and compatible components together.
Useful questions for your appointment include:
- Tightening method: How will the team apply the manufacturer's specified torque?
- Maintenance checks: How will the team assess possible loosening during follow-up visits?
Ask how the team tightens the screw and checks it over time. Precise fit and controlled assembly matter more than the connection name on the box.
Why Abutment Design Affects Cleaning and Gum Health
Is titanium or zirconia better? That's a reasonable question, but can I clean around this design? may be more useful. A material choice alone can't compensate for a contour that leaves you unable to reach the gumline.
The emergence profile is the transition from the narrower implant region to the wider replacement tooth. Abutment height, angulation, and the number of times components are disconnected also deserve attention. Together, these decisions influence the space available for gum tissue and everyday cleaning.
What the evidence does and doesn't establish
A clinical review of abutment characteristics and peri-implant health found limited direct evidence that these characteristics independently cause disease, but reported signals favoring fewer prosthetic disconnections, transmucosal placement, abutments at least 2 mm high, and emergence angles below 30 degrees. It also described associations between greater peri-implantitis risk and restricted hygiene access, convex emergence profiles, and emergence angles above 30 degrees.
Those findings are associations, not guarantees or a universal prescription. They don't establish the cause of inflammation in an individual patient, and they don't mean you should choose an abutment height without an examination.
Consider a restoration that looks natural from the front but curves outward sharply near the gum. If that contour blocks a cleaning brush, appearance and maintenance may be working against each other. Full-arch restorations can present a similar challenge when the underside is difficult to reach.
A useful design discussion includes a demonstration of how you'll clean the finished restoration, not just how it will look.
Ask your dental team to address these practical points:
- Daily access: Can I reach the gumline with floss, an interdental brush, or another recommended aid?
- Component removal: When might parts need to be disconnected, and for what reason?
- Professional maintenance: What examinations and cleaning visits will my situation require?
Front-tooth appearance, screw access, future repairs, and cleanability sometimes involve competing priorities. The aim is a plan you understand and can maintain, rather than a cosmetic result considered in isolation.
Abutment Materials and What Each Trades Off
Abutment materials and their trade-offs
| Material | Commonly Considered For | Main Trade-off |
|---|---|---|
| Titanium | High-load posterior or off-axis sites | Mechanically favored in those sites; less esthetic when visible through thin gum |
| Zirconia | Visible anterior sites where gray show-through is a concern | Higher reported fracture incidence for ceramic abutments in some configurations |
| Alumina | Ceramic alternatives assessed for peri-implant tissue response | Similar one-year tissue outcomes in comparative evidence; no separate alumina fracture estimate established by that comparison |
| PEEK | Emerging option under study | Preliminary findings only; long-term clinical evidence is limited |
Material selection isn't a ranking of quality. The appropriate choice depends on tooth location, tissue thickness, chewing forces, restoration type, and the repair strategy if a component develops a problem.
A systematic review and meta-analysis comparing abutment materials found no statistically significant differences in key peri-implant tissue outcomes after one year for titanium compared with zirconia or alumina; its zirconia-versus-titanium marginal-bone-level comparison had a mean difference of -0.24, with a 95% confidence interval from -0.65 to 0.16. That result doesn't establish a clear tissue-health advantage for either material.
Appearance and mechanical demands
Titanium is often considered when mechanical demands are substantial. Its potential cosmetic limitation is its metal color, particularly where thin gum tissue could allow gray show-through.
Zirconia offers a tooth-colored alternative for visible areas. That can be useful at the front of the mouth, but it doesn't make zirconia universally healthier or remove the need to assess loading and connection design.
A systematic review of abutment materials and peri-implant tissues reported ceramic-group abutment fractures and veneering-material chipping, while describing PEEK findings as preliminary with limited long-term clinical evidence. Alumina should likewise be evaluated as a specific ceramic option, not assumed to share every outcome reported for zirconia.
Ask what benefit applies to your tooth
A premium label doesn't explain whether a material will improve your particular restoration. A more informative conversation considers these questions:
- Visible benefit: Is gray show-through a realistic concern at this site?
- Mechanical compromise: How does my bite affect the material choice?
- Repair planning: What would need replacement if the abutment or restoration fractured?
Dr. Finley evaluates these factors individually. Fit, cleaning access, and a clear explanation of the trade-offs deserve as much attention as the material's name.
Confirm Your Abutment Plan at Your Consultation
Bring your questions about where the implant will sit, whether the abutment could affect appearance, and how you will clean and maintain the finished restoration. Those three points turn the abutment from a hidden part into a design choice you can discuss.
At Bristol Dental & Orthodontics, the initial consultation includes an examination and imaging to evaluate jawbone density and structure. Dr. Andrew Finley, who has advanced implant training from the California Implant Institute, reviews your options and explains which approach fits your circumstances.
Plan for follow-up as well as placement
A systematic review of implant-abutment connections reported five-year abutment failure rates ranging from 0.7% to 2.8% across connection types, without a demonstrated difference between connection categories, while finding screw loosening more predominant with external connections and a significantly higher incidence of abutment fracture with ceramic than metal abutments.
Regular examinations let the dental team assess the crown, screw access, bite, gum tissues, and implant components. If a restoration begins to feel loose or your bite changes, contact the dental team rather than attempting to tighten anything yourself.
This is general educational information. Dr. Finley can assess what applies to you after examining your mouth and reviewing your health and treatment needs.
Bristol Dental & Orthodontics offers dental implant care for patients in Santa Ana and Orange County. Visit Bristol Dental and Orthodontics to schedule a consultation with Dr. Andrew Finley and discuss your abutment options, treatment sequence, and long-term maintenance needs.